How to Create a Squarespace Portfolio That Gets Clients
Pin this post to Pinterest! ☝🏻
WHY YOU NEED A PORTFOLIO
Whether you design websites, sell houses, or consult with multi-million corporations, you need a portfolio of your work. The Portfolio page is a crucial part of your website. It's the page that sets you apart from the new kids on the block that are trying to establish themselves as a solid business.
Thankfully, Squarespace makes it easy to build a stunning portfolio, which I'll show you how to do.
The Portfolio page serves a few purposes -
It establishes that you're a bona fide company that gets results
It proves to others that you can identify the customer's problem and solve it
It demonstrates that you've 'been there, done that'
Let's face it, do you want to hire the roofer who just got his license last week or the one who's been installing and repairing other people's mistakes for the last 5 years with an arsenal of positive testimonials?
Let me be clear... I am NOT saying that new businesses don't know what they're doing and aren't still effective (we were all new at one time). But the longer you're in business and the more you expand your body of work, the more it's going to help propel you forward.
Time is on your side.
Psst: Get the free checklist below to make sure you’re ranking on Google!
HOW DO I GET MATERIAL FOR MY PORTFOLIO?
This is the number one question for people who are just starting out, and I get it.
You need to get clients so you can build a portfolio. But, you need a portfolio so you can get clients. It's a never ending cycle.
So how do you break it?
You can always offer your service at a discount to a handful of people in exchange for a testimonial. That way you're still getting paid, but you're also getting something in exchange. Testimonials are powerful.
However, no matter how desperate you feel to get a client, do not do it for free!!
Your work has value.
Period.
Even if you're new.
The sooner you can get over the hurdle of shortchanging yourself, the faster you'll be on track to achieving success.
I always recommend sending an email to everyone in your mailing list letting them know about the new venture you're embarking on. Tell them you're willing to do your service at a discount of $X amount for the first 5 people (or however many) that reply to your email.
Scarcity causes people to take action. You'll get a much better reply rate by limiting it to just a few people than you would if you said, "Reply and let me know if you're interested." Why? Because people do not like missing out.
HOW TO CREATE A PORTFOLIO THAT CONVERTS
You can see my full Portfolio page, but for this tutorial I'm going to show you how to create the carousel at the bottom that says "previous work" with the case studies included.
The purpose of your portfolio page is to tell a story.
This is essentially the layout of your case study:
Here's the problem my customer had.
Here's what I did to fix it.
Here's the result they got.
It's that simple.
STEP 1: CREATE THE CASE STUDY
Here's how I accomplished that on my website. The "case studies" are set up as blogs. So if you don't already have a blog, click the plus sign in either the "main navigation" or "not linked" section. Next, create a new blog post.
Here's an example of my case study for Dr. Don’s Woodturning. You can see that I followed the same outline as the bullet points above.
First, I established my client's problem: He had an existing website but he hadn't sold any items and it was a bad design.
Then I talked about how I solved his problem: I created a new logo that was eye catching and created a design for his website that tied to his business of woodturning.
I even included an example of his old website compared to his new website. This really is key because it shows the transformation. Your Portfolio page should show exactly what happened when you waved your magic wand. It's crucial that people visually see your work.
Finally, I discussed the result of the product I delivered: He's seen an increase in sales from his website and received several custom orders.
As you can see, the page is pretty simple overall. It explains those 3 components and has enough visual elements to help tell the story. It also has a way for people to get in touch with me to start their own project.
I highly encourage you to create visuals to use on this page. As a web designer, it was important that I show the color palette, the logo, images of the site, before/after, etc. This will be different depending on what your business is. I created all of my images using Figma.
Once you've published your case study page, go to the settings on that blog post (click the 3 dots next to the post on the back end) and click Options. Click Categories and type "Portfolio".
*Be sure and do this on every case study.
I went one step further and added a Portfolio section to my Blog page so that people can click that link and see every case study.
STEP 2: CREATE THE LIST SECTION ON YOUR PORTFOLIO PAGE
Now we need to add the List section on our Portfolio page. This is the carousel that rotates through the images of your projects.
Go to your Portfolio page and click the blue Add Section button on your page, then click People, and click any of the images that have an "i" with a circle around it. You can just click the first one.
I know what you're thinking, "Why would I click 'People' and not 'Portfolio'??"... Hang with me.
All of these sections with the "i" are called List Sections. They are all the same section, just laid out differently, which is why it doesn't matter which one you click. They all have the same features.
Something to know about List Sections: You cannot modify the section. In other words, you can't add other blocks (image, text, etc) to that section.
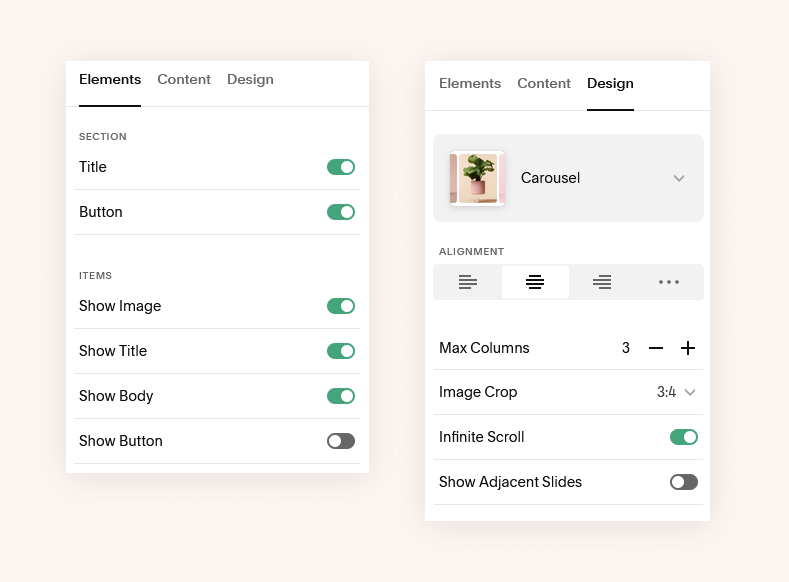
To edit the settings of your section, hover over that section and click Edit Content. Here are the exact settings I used for my List section:
To add each item in your Portfolio, click Content in the settings. You'll need to delete the prefilled content that Squarespace has in this section. Then click Add.
Double click the new list item.
Now add an image, include alt text, type the Title, and type "See the Case Study" in the description.
Highlight "see the case study" and hyperlink it to the Case Study post you created in your blog. I have mine set to open in a new tab.
Continue doing that for every item you have in your portfolio.
In the Content settings you'll also see the Title and Button.
Click "Title" and give your portfolio a name.
Click "Button" and name it, then link the button to the Portfolio category in your blog. That way when people click the button it will take them to all of the Case Studies that you created in your blog. Mine is "/blog?category=Portfolio", but yours may vary depending on what you named your blog and your category.
You’re done!
You should now have a rotating carousel on your Portfolio page that links to the case study of each project.
OTHER THINGS TO INCLUDE
It's crucial to include a way for people to take the next step. So you've displayed your portfolio and convinced them that they need to hire you, now what?
You can do this one of two ways.
The first way is to include a call to action button. This might be a Contact button, or a Schedule a Consultation button, or whatever the next step is in your process.
The other option is to have a form on the page to fill out. This is the way I've chosen to do it on my website. The reason is, I want it to be SUPER EASY for someone to take the next step. I don't even want them to have to leave the page they're on. I don't want them to pick up the phone, or go to another page to do another step. I want it to be right here in front of them.
Any time you want someone to take an action - whether it's making a purchase or scheduling a consultation - the least amount of steps and clicks someone has to make, the higher your conversion rate will be.
You might also want to include an FAQ section.
People are going to have questions. Most people won't send an email to ask their question...instead, they'll just go somewhere else. Including an FAQ section gives you the opportunity to squelch their concerns so that they'll go ahead and take the next step in the process.
DO I HAVE TO INCLUDE EVERYTHING IN MY PORTFOLIO?
Not at all! I don't have everything included in mine. Not every project is going to turn out just the way you want it to, and that's ok. Maybe you worked with a client who had their mind set on a design or idea that you weren't crazy about. If you aren't 100% in love with the project, you don't have to include it.
Plus, as you develop more projects, you can rotate off some that you didn't love quite as much and replace them with top-notch projects.
Another thing… If you are a web designer, be careful if you choose to include a link to the actual live website in your case study. I only link to the sites that I still maintain creative control over. If the client decided to make some alterations after the site went live, I don't link to it because I don't want my name associated with it.
Feel free to drop your Portfolio page in the comments and promote your work!
*This post may contain affiliate links, so I may earn a small commission when you make a purchase through links on this site at no additional cost to you.


