How to Use Quiz Marketing to Grow Your Email List (with Interact + Flodesk)
Pin this post to Pinterest! ☝🏻
I put off making a quiz for way too long.
I thought I needed a tech degree… or at least a spreadsheet with formulas and color-coded logic paths. The idea of setting up something where different answers led to different results made my brain short-circuit. So I just… didn’t.
Which is a shame, because quizzes are pretty much genius for email marketing. They’re fun, interactive, and people actually want to take them (as opposed to signing up for a newsletter and never opening a single email again).
Eventually I finally caved and built my first quiz after hearing great things about Interact. And wow — it was not the nightmare I expected. No coding, no complicated setup, and the best part is, it works beautifully with Flodesk (my email platform of choice).
So, if you’re a business owner, designer, or Squarespace user who’s been curious about how quizzes could help you grow your list and send better emails, this post is for you.
I’ll walk you through:
Why quizzes are so powerful
How I came up with my quiz topic
How to build your quiz using Interact (step by step!)
How easy it is to connect everything to your Flodesk workflows so you can start seeing real results.
Let’s go!
Why Quizzes Are a Smart Marketing Move (Even If You're Intimidated)
Quizzes are the perfect mix of fun and function. They’re interactive, they give people an instant result, and they give you valuable insight into what your audience wants and needs. It's a win-win.
Here’s what makes them so effective:
They feel personalized (because they are)
They naturally create connection and trust
They convert better than traditional opt-ins
They’re easy to share (aka FREE organic reach)
They help you segment your audience based on needs, goals, or personalities
In short: If you’ve been looking for a better way to grow your list and start meaningful conversations with potential clients or customers, a quiz is it.
A quiz is a low-pressure way to get people onto your list — and once they’re in, a well-written welcome sequence can build trust, deliver value, and lead them toward your offer.
My Quiz Topic (and What Inspired It)
The idea for my quiz came from launching my guide, “Master Your Home Page” — a blueprint that walks you through how to build a home page that actually works.
That guide got me thinking:
What if someone could figure out their website’s “personality” first — before they even start building or rewriting their homepage?
That kind of self-awareness could help them make better design decisions, clarify their message, and skip the endless guesswork.
So, my quiz is called “What’s Your Home Page Personality?” and it leads people into one of four result types based on their answers. From there, they get personalized homepage tips automatically sent through Flodesk (keep reading - I’ll show you how).
It’s like a sneak peek of how I work — helpful and strategic, with a bit of personality.
How to Choose a Quiz Topic That Works
If you’re stuck on what kind of quiz to make, ask yourself:
What do I want someone to know or understand before they work with me?
What’s a common problem your audience faces — and how can you help them solve it?
What result or insight would be helpful, actionable, and maybe even fun?
Here are a few formats that work well:
What’s your [blank] style? (design style, brand vibe, messaging tone) - this is the one I chose!
What’s holding you back from [result]?
Are you ready for [next step]?
What type of [blank] are you?
Keep the result types simple, and make sure each one ties back to something you offer — like a free resource, a paid product, or a service you offer.
Tips for Creating a Quiz People Will Actually Finish
If your quiz is too long, confusing, or trying too hard to be clever, people will bail halfway through. Here’s how to keep it fun, clear, and conversion-friendly:
Keep it short and sweet: Aim for 5-7 questions so that it can be completed in less than 2 minutes.
End with a strong Call To Action: Connect them to a relevant offer, blog post, or workflow.
Be sure to test it first: Try it yourself to make sure everything is connected correctly (VERY important!!).
STEPS FOR BUILDING A QUIZ IN INTERACT
Step 1: Create an Interact account
Head to tryinteract.com and sign up for an account if you haven’t already. You can start with their free trial to get a feel for the platform (no credit card needed).
STEP 2: Click “Create New Quiz”
STEP 2: CHOOSE HOW TO CREATE YOUR QUIZ
One cool feature that they have is the “Generate with AI” quiz creator. If you don’t have a particular topic in mind, you can enter your website URL, tell the generator a little bit about your business, and it will produce some quiz ideas.
For my quiz, I selected “Start from scratch”.
STEP 3: CHOOSE YOUR QUIZ TYPE
From here, you’ll choose the type of quiz to create.
Assessment (scored quizzes with right/wrong answers)
Personality (most common)
Scored (each answer points to a result, but not as in-depth as personality)
I chose “Personality” for mine.
STEP 4: Name your quiz and add your cover content
Now it’s time to customize the layout so that it looks and sounds like you.
First, give your quiz a title that’s clear, a little fun, and makes people curious. Add a short description and your quiz image. You can use a stock photo or something custom — just make sure it fits your brand.
This is also where you can customize your quiz button (instead of just "Take Quiz") to something more on-brand like:
Let’s do this
Show me the results
Find out now
You can also change the colors for the Option, Selection, Progress Bar, and Button so that it matches your brand. The only thing you won’t be able to change (unfortunately) is the font.
Don’t forget to add your logo!
Here’s how mine looked after I customized the cover page:
Step 5: Write your questions
Aim for 5–7 questions to keep it quick and engaging (and not a chore). We will link the answers to the results in a later step.
Here’s how my first question looks:
You also have the option of adding an image for each response:
Next, click “Add New Question” to continue adding more questions.
STEP 6: CREATE YOUR RESULTS
Before we get too deep into the results, first decide how you want the results to be displayed to the user. There are 3 options:
Show the quiz results in Interact. You can add links and buttons to the results page if you want to direct them somewhere else.
Create a page on your website for the results and redirect the user to your website. This is what I did. The reason this is best is because it’s fewer clicks for the user, and it puts them back on your website where they can take their next step.
Use the quiz as a lead generator so that they have to enter their email address to see the results. I don’t recommend this one, but I will talk about it more in a later step (keep reading).
Click “Add A New Result” on the left hand side to add your result.
If using Option 1 (showing quiz results in Interact), here is what the design options look like:
If you’re doing Option 2 (creating a page on your site), you’ll need to create your results page on your website first (or at least create the URL so you have something to link).
It’s a good idea to remove the header and footer so that people aren’t tempted to click somewhere else. We want to steer them towards taking one particular action (filling out the form).
Also, be sure to turn ON “Hide Page from Search Results” in the SEO settings so that this page doesn’t show up in Google.
You will need to create one page for every type of result you have.
I embedded my Flodesk form on my results page so that they can sign up for the “Master Your Home Page” guide when it releases. Including an image of your lead generator will also increase the conversion rate. If you need help connecting Flodesk, here’s a post on integrating Flodesk with Squarespace and creating Flodesk workflows.
Here is my results page for the “Overachiever” result:
To redirect your results to another page, click “Redirect Results” on the left and enter the URL for each result. Click Save.
STEP 7: LINK YOUR QUESTIONS TO THE RESULTS
Now that your results are in place, we need to go back to the questions and link them to the results. Click your first question on the left hand side, then click the “Edit Results Correlation” button.
Select the question on the left, then select the result on the right. You can select multiple results for a question. And a result can be used for more than one question.
STEP 8: SET UP the LEAD GENERATOR (IF YOU’RE USING THIS)
If you turn on “lead generation”, this will force people to fill out a form in order to view their results. Let me just tell you right now, your drop off rate is going to be high.
To me, it feels a bit like trickery to get them involved in the questions and then dangle the result like a carrot in front of them to get them to fill out a form.
I’d much prefer to be helpful to people and not manipulate them into filling out a form in order to get results, so I don’t recommend this step. Instead, I direct them to the results page on my website that shows them their result, points them towards something helpful, and then they can CHOOSE to sign up for that or not.
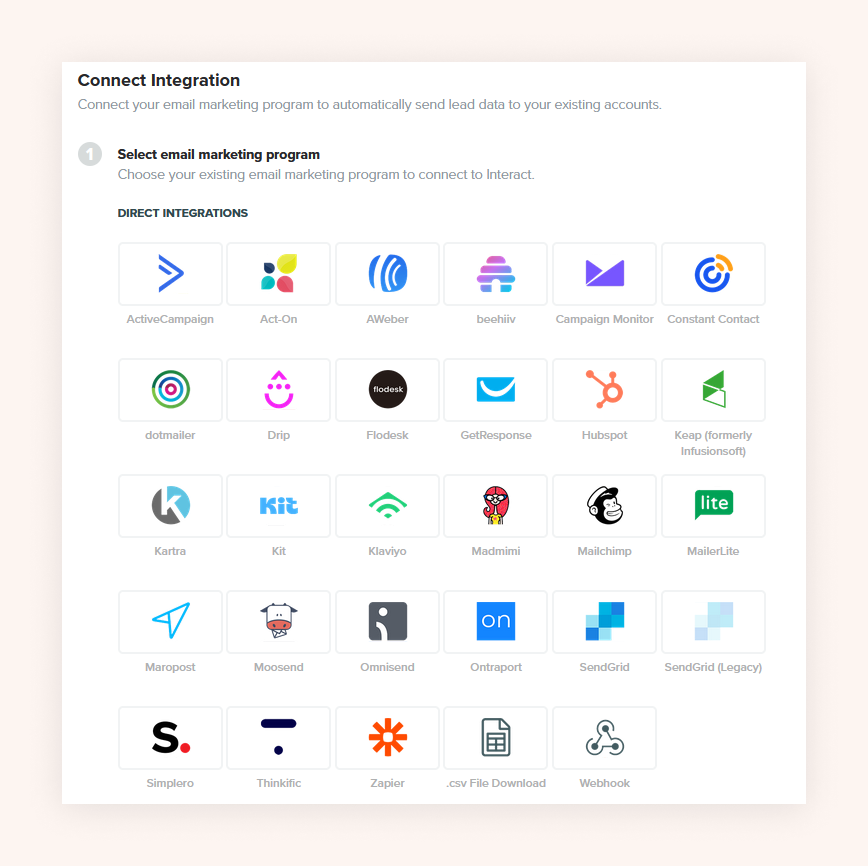
However, if you do choose to go this route, you can see below all of the programs that Interact integrates directly with (it’s a lot!) so that you don’t have to use a 3rd party program. This is an impressive amount of programs, and chances are high that your program is on this list.
STEP 9: PUBLISH YOUR QUIZ
You made it! Click the purple “Publish” icon in the top right to publish your quiz. You’ll see this pop up below - click Publish Changes again.
STEP 10: DISTRIBUTE YOUR QUIZ
Now it’s time to get the word out! There are a few ways to do this:
Use a direct link
Embed the quiz on your website
Use an announcement bar
Use a pop up
Create a Facebook Ad
For my quiz, I use a direct link. The reason I don’t embed it on my website is because I like that Interact’s quiz platform is just that - the quiz. There aren’t any distractions that people can click in the middle of the quiz. So, they take the quiz on Interact, then the results take them back to my website.
If, however, you have multiple quizzes, it might be better to create a /quiz page on your site that houses all of them. That way people can see them all in one place.
If you do want to embed it on your website, I recommend using the Javascript option. You’ll also want to select the same boxes I toggled on below.
Final Thoughts (and an Invitation)
If you’ve been putting off creating a quiz because it felt too hard, you’re not alone. I did the same thing for years. But I promise — with the right tool, it’s not as scary as it seems.
Interact made it easy, and Flodesk made it beautiful.
Together, they helped me create a marketing tool that not only grows my email list, but also helps people make better decisions about their websites.
Want to see it in action?
Take my quiz, “What’s Your Homepage Personality?” or join the waitlist for my upcoming guide, Master Your Home Page, right here:
And if you’re not using Flodesk yet, use this link to get 50% off your first year.
Your email list will thank you.
*This post may contain affiliate links, so I may earn a small commission when you make a purchase through links on this site at no additional cost to you.


