New to Squarespace? Start Here.

Pin this post to Pinterest! ☝🏻
BEGINNER’S GUIDE TO SQUARESPACE
If you're a brand new to Squarespace, or even web design in general, then this intro to Squarespace is the place to start. This beginner’s Squarespace tutorial will set the foundation so you can start building your Squarespace website.
One common question I get is, "Does it matter which Squarespace template I use?" And the answer is no. All Squarespace templates have the same features. If you just started your Squarespace trial, you'll want to check out this post.
HOW TO CHOOSE YOUR COLOR PALETTE
Without a doubt my favorite part about creating a new site is setting the color palette. Color is such an integral part of site design. Really take some time and put some thought into choosing your site colors so that it doesn't look like they were chosen by a 3rd grader.
To set your colors, go to Design -> Site Styles -> Colors
Here you'll see 5 colors, with the middle color being the predominant color. Squarespace takes those colors and breaks them up into themes ranging from Lightest 1 to Darkest 2. We'll talk more about that when we talk about the page sections.

Click Edit Palette. There are a variety of ways to determine your color palette. Squarespace has some presets that you can choose from. You can also upload an image or choose a color palette based on a color.
Outside of Squarespace, Coolrs.co is a great color palette generator. I also search Pinterest for color palettes (here are some of my favs).
If you already have a logo, then you can use the colors in the logo.
If you have specific colors that you want to use, you can enter the hex codes in the palette editor.
TIP: Be sure your colors range from light to dark (left to right). In other words, you don't want to have 5 different shades of the same color. You’ll also want to include an accent color that pops so you can use that for your buttons.
Don't forget to save your settings once you're finished.

HOW TO SET YOUR FONTS
To set your fonts, go to Design -> Site Styles -> Fonts

There are literally hundreds of fonts built into Squarespace, so you shouldn't have any trouble finding one! But if you do have a favorite font that isn't in Squarespace, you can always add it.
Just like when choosing a color palette, you want to take some time to choose your fonts. You'll need to choose a heading font and a paragraph font that work well together. Here are some things to consider when choosing fonts:
Is the font easy to read?
What mood are you going for?
Which fonts fit your brand?
Are the fonts similar?
Be sure to use no more than 2-3 fonts on your site. You also want to choose 2 fonts that have enough contrast so that they don't look too similar. I usually head to Pinterest to look for good font pairings, but here are some other fonts that work well together.
Once you've settled on your font choices, you can start assigning them to your site styles. You'll need to choose the headings, paragraphs, buttons, and miscellaneous. Start by selecting Headings.

Here are the settings:
Family: Font style
Weight: How bold the font is
Style: Normal or italics
Line Height: The space between sentences
Letter Spacing: The spaces between the letters
Text Transform: Text will either be all uppercase, all lowercase, the first letter of each word capitalized, or select None for the text to appear as you type it.
Choose the size of Headings 1-4. Heading 1 (h1) will always be at the top of the page (only use one h1 per page) so it will be the biggest font. The smallest font will be h4.
Now go back and do the same settings for the paragraph, button, and miscellaneous text. The miscellaneous text controls the tags and product prices. Feel free to explore the settings in "Assign Styles", but you won't need to change any of that to start with.
Be sure to save your settings once you're finished.
HOW PAGES WORK
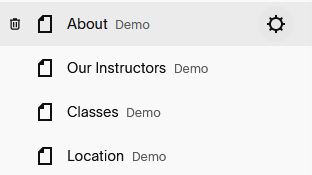
On the left, click Pages to see all of the pages on your site. Pages listed under "Main Navigation" will show up in the navigation at the top of your site. If a page is listed under "Not Linked", then it is still active, it just isn't in the navigation at the top.

There are 2 things to notice here:
The Home page is in the "Not Linked" section. That is because your logo (where it says Your Site Title) is the link for the home page. If someone clicks your logo, they will go to the home page, so you don't need another link in the top navigation that says "Home"
Book A Class is also in the "Not Linked" section. That is because it's the yellow button in the navigation. Skip to the “Setting Up A Header” section to see how to link the button in the navigation to a page.
If you want to move a page from "Not Linked" to "Main Navigation" just drag it to that section.
Click the plus sign to create a new page. There are many options to create when you click the plus sign, but the "Blank Page" is going to be what you will mostly use.

To create a drop down navigation with multiple links, create a folder and then move the pages within that folder that you want to drop down.

There are several settings within the page. Hover over the page name and click the gear icon to access the settings.
In the General section, you can set the Page & Navigation Titles, the URL, Enable/Disable the page and either duplicate the page, set it as the home page, or delete the page.
TIP: When you are naming your pages, be sure to separate each word with a hyphen (/page-name). This will help it to rank higher in Google.

The SEO section is where you can set the Title and Description that appear in Google search results. If you leave it blank, Google will create a description based off of the text on the page.
There is also the option to hide a page from search results. You would want to do this if you have a page that is password protected or if you have a page that you don't use anymore but you don't want to delete.

The Social Image section is if you want to upload an image that will appear when you share a link on social media. If you don't add an image then it will use your logo.
The Advanced section is where you would add any code that you’re using specific to that page. This is an advanced thing and isn't very common. More than likely you won't need to use this. If you DO use code, most CSS is placed in the Design -> Custom CSS section. If you want to venture into the world of code, here is a good post with 5 CSS snippets that will elevate your website.

SETTING UP THE HEADER
The header is the top section of your site that includes the logo and navigation links. It will appear the same on every page, so if you make changes on one page it will effect all of the other pages.
Start by clicking Edit -> Edit Site Header. There are lots of settings in here, including settings for your overall site, desktop view, and mobile view (the 3 icons in the top right).

Start with the overall settings and click Site title & logo. Right now, your header is displaying the site title (“Your Site Title”), but once you upload your logo it will replace the text with your image.
If you don't have a logo, then just enter your site title. Even if you are uploading a logo, you will still want to enter the site title. If you have a different logo for mobile devices, you can upload that, otherwise it will display the first logo you uploaded.
Now go back one section and click on Elements. If you want to have a button in the navigation, then toggle the switch on. Name the button and select the page you want the button to link to. I always recommend having a button here as your call to action.
The button should be the number one thing you want customers to do when they land on your site. Is it to purchase something? Set up a consultation? Whatever it is, put it in the button.

You can also turn on social links, make your site multilingual, and show the cart icon if you have an ecommerce store.
Go back one section and click Style.

There are 4 types of styles for your header -
Solid: Choose a solid color for the header.
Gradient: Applies a gradient color to the header.
Theme: Choose your color theme and that will be the theme for the header on every page.
Dynamic: Use this if you want the header to be transparent so you can see the image beneath it. The header will be the same color theme as the first section on each page.
Go back to the previous section. Here you can choose if you want the header to stay in a fixed position or not. If it’s in the fixed position, then the header will remain at the top while you scroll down the page.
Now click the desktop icon at the top. This section determines the placement of the items in the header on a desktop. Click Header Layout and you'll see the different options.

You can also set if you want the header to be the full width of the page or inset and also adjust the padding and spacing between the links.
Now click the mobile icon at the top of the settings. The Header Layout will determine the layout for a mobile device. Click the Overlay Menu to adjust the alignment, link spacing, and colors. You can also adjust the text size with some simple code.

You can choose the style of the menu icon, either lines or a plus sign, and the setting beneath it determines the thickness of the icon. Click the 3 dots if you want to specify a number for the thickness.
One last thing about the header... if you want adjust the fonts on the header, click the Paint Brush Icon -> Fonts -> Assign Styles -> Header. Here you'll find the settings for the site title, mobile site title, site navigation, and header button.

HOW SECTIONS WORK
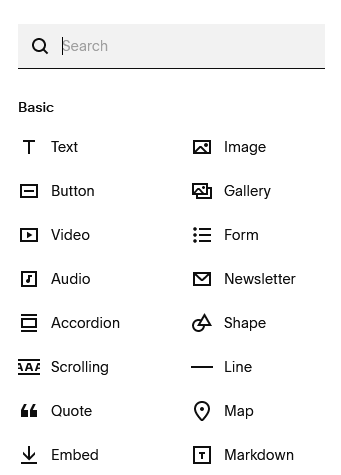
Now we can start editing the body of the page. Click the blue button that says Add Section.

There are many types of sections you can choose. I always choose "Add a blank section", but if you're just starting out, you may want to choose one of the sections that's already built.
These sections all use fluid engine. If you want to use the classic editor, scroll to the bottom to add a blank section using classic editor.

Once you add your section, then you can start adding other elements within it. Click Add Block and then you can start adding text, images, buttons, etc. One nice thing about fluid engine is that you can copy/paste blocks instead of adding a new one every time. So if you already have a text block formatted the way you want it, just copy and paste it, then you can replace the text.

If you hover over a section, you'll see Edit Section, an icon to copy the section, a heart to favorite it, the ability to move it up and down, and a trash can to remove it.

The heart icon is a convenient feature. If you have a feature that you want on multiple pages (like a newsletter block), you can save it as a favorite (click the heart), then when you go to add a new section, just click Saved Sections and you will see your section. It saves a lot of time so that you don't have to recreate everything.
SETTING UP THE FOOTER
Now we've come to the bottom of the page! The footer works the same way as the header, in that it looks the same on every page. Scroll down to the bottom of your page and click Edit Footer. This operates just like a regular section above in the way that you can add blocks (image, text, etc). Just lay it out the way you want to and then hit save to finish.
One thing I like to do is remove the underline on the hyperlinks. It's an easy way to class up the footer so that it doesn't look cluttered.
RESIZING FOR MOBILE
If you are using Fluid Engine (you probably are), you'll need to resize everything for a mobile device. If you're using the Basic Editor, it automatically does this for you.
Click the mobile icon at the top right of your page. This shows you how it looks on a mobile device. It probably looks like a mess right now. So just go through and resize/rearrange the items so that it looks correct. It is not supposed to change anything on the desktop view, however, I always go back and double check the desktop view because every now and then something is effected.
That's a crash course in getting you past the beginner stage if you're new to Squarespace. If you get stuck on anything, there are lots of resources on the blog. Or if you don't see something there, feel free to reach out with your question.
*This post may contain affiliate links, so I may earn a small commission when you make a purchase through links on this site at no additional cost to you.